Setting up a development Apache 2 web-server on Ubuntu 12.10 or 13.04(Install Apache 2 web server, PHP, MySQL Database server,phpmyadmin)
Here we have 5 steps to complete this installation.
Step 1 Updating the system.
Open the terminal from the launcher or by pressing Ctrl+Alt+t.
Now before we stat installing anything you need to check for updates by typing:sudo apt-get update
You should enter your password when prompted. If there are any
updates found you should agree to update and let them install before continuing on with the installation.
Step 2 Installing the Apache 2 web server and PHP.
Now that the system is up to date we can install the Apache 2 web server by typingsudo apt-get install apache2
Next we will install PHP by typingsudo apt-get install php5
If asked asked to confirm the installation press Y or Enter to proceed with the installation.As these instructions are for a development web-server we will now install the Xdebug PHP 5 debugging library (this can be skipped if you just want to host PHP websites)
sudo apt-get install php5-xdebug
Step 3 Installing the MySQL Database server
Now we need to install the MySQL Database server that we will be using to provide data for our websites by typing: sudo apt-get install mysql-server
You may be asked to confirm the installation so press Y or Enter if needed to proceed with the installation.You will be asked for a password for the root (administrator) user.
MySQL Password Prompt
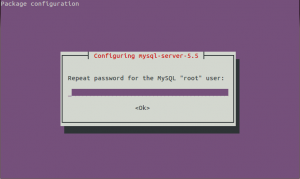
You will then be prompted to repeat the password that you just entered to confirm that it’s correct.
MySQL Password Confirmation
sudo apt-get install php5-mysql
Step 4 Testing the Installation.
Test the web-server installation in Firefox by typing localhost in the address bar.Apache test page.
Step 5 Installing the MySQL administration system (optional).
Th help use create, manage and delete MySQL databases we are going to install the web based phpMyAdmin database administration system.To install phpMyAdmin type the following in the terminal:
sudo apt-get install phpmyadmin
If asked asked to confirm the installation press Y or Enter to proceed with the installation. Once downloaded you will be presented with a series of dialogs to configure phpMyAdmin with your database server and web server.
The first dialog asks what type of web server you are using. You will see a red box showing the highlighted option. The currently selected option will have beside it.
First phpMyAdmin set-up dialog to select the web-server type.
On the screen above make sure that the apache2 has the red highlight (use the arrow keys to select it if required) and press Space to select it (you will see a *) then press Enter.
The dialog will allow you to create the dbconfig-common database used by phpMyAdmin.Second phpMyAdmin set-up dialog to configure the database.
The next dialog requests the database administrator password to create and manage databases. You need to type the password for the administrative (root) account for the database server then press Enter. The password will be obscured.
Third phpMyAdmin set-up dialog to enter the root database password.
For the next dialog you can safely select <OK> (by using the Tab key) then press Enter to generate a random database password for the phpmyadmin user.
Fourth phpMAdmin set-up dialog to configure the database password.
Next we will test the php, mysql and phpmyadmin installations by typing localhost/phpmyadmin in the Firefox address bar.
Testing PHP, MySQL and phpMyAdmin.
The user name is root and the password is the database server root password. If you can login then PHP, MySQL and phpMyAdmin are correctly installed.


No comments:
Post a Comment